The idea for a sword began when I made jewelry for the wedding of some of our friends, Chuck and Debbie (not the same Debbie whose jewelry I have been recently blogging about).
Chuck is one of the handiest guys I know, and one of his many skills is Blacksmithing. Debbie and Chuck are involved in Medieval Festivals in a couple ways. Chuck makes chain mail, knives, and swords as close to those from those olden days as you can find. They also have a family musical group called Evergreen that often plays at these festivals on period instruments.

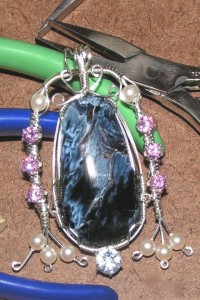
The wedding was a costumed Medieval wedding for their son and his new bride. I made custom pendants of beautiful blue Pietersite for them. I also made a sheriff’s star for another son. The idea of trying a sword came about as a barter between Chuck and I.
Chuck tells:
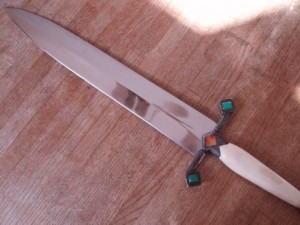
Originally, the blade was to be a standard 30 to 33 inch sword. The steel was part of a leaf spring from a late 70’s to early 80’s vehicle, usually good steel for this sort of thing. The tang was drawn in the forge, then the blade was drawn with hammer and heat. I was using a charcoal forge instead of coal or gas. I’ve been using charcoal for a more authentic effect at Renaissance and SCA events. The blade was 80 percent complete when I noticed a small flaw in the steel at almost exactly the middle of the blade down its length. I tried everything I could to eradicate the blemish. I surmised that being from that period of time when recycled steel and much of it coming from inferior sources was the cause. It was very disappointing as I already had much work into this blade. I decided to cut the blade short and to finish the project as a short sword. These were also typical weapons throughout the Middle Ages, made for close-quarter and two-handed fighting. I was able to get rid of the blemish and the sword turned out to be quite well balanced and looks great. The cross guard and pomel are of mild steel. After talking with Don, the swords future owner, on the design and layout of the fittings I went back to work on the shaping and finishing of the fittings.
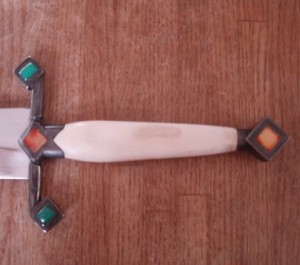
As Chuck was smithing the blade and butt of the sword, I was thinking about what jewels might have been in a sword of that time. A little library research delivered limited results. Certainly carnelian agate may have been used as well as other agates and maybe some rubies, sapphires, and garnets. I decided that I should add some chrysoprase. Although it was certainly not used in these swords, as the best material comes from Australia, I liked the color. It resembles aventurine which may have been used in Medieval times.
Now I had a new problem. I had decided on square cut inlays. How do you cut out square holes in steel? Certainly not with my rock-polishing equipment. I asked my neighbor Mike if he could make square holes in the sword butt so I could insert gems. I think Mike was getting used to all my wild ideas by then and he suggested the answer was a carbon burn out technique.

I got the sword back from Mike, cut the stones to precisely fit, yet I was not happy with the carnelian agate stones in their cut out holes. Because they were transparent, the dark depth of the metal background in the holes came through the gems and you could not even tell they were golden in color. They just did not shine. I tried a couple things to brighten the stones including painting gold fingernail polish in the holes. This did not work because the paint was too thick. I had a couple other lame ideas, but I finally thought that gold leaf might work if I could find someone who did that! I stripped the fingernail polish out of the holes and took the sword to a local sign shop that does gold leaf. I think the owner had fun with this project. He told me his employees seemed to work better when he had the sword in his hand! The gold leaf worked like a charm and created a glow that comes through the stones and makes them look noble and amazing.
I returned the sword to Chuck for final polishing and a placement of a bone handle on the unit.
Chuck again:
The two bone slabs were fitted over the full tang and “let in” to the crossguard to insure stability. The slabs are epoxied with a little bone dust for color matching mixed in. The steel parts were blued after all fitting was complete. The end of the tang is threaded and the pommel is tapped so that the parts may be removed if necessary.  It took almost two years to complete this project as the different phases of construction were accomplished by different individuals. All in all, I am very pleased with how it all turned out.
Chuck Sieting
OK, it took Chuck over a year, and it was most fun jabbing him about finishing the sword whenever I saw him around!
I received the beautifully polished sword back eventually and I am pleased to own it, as it is a real show piece.
I added up how much this piece of art might cost with everyone involved and came to a $650 price. So if you want something like this, we can do it, but it won’t be cheap. And you know that though it might be a short sword, but it had a long construction!


